Sunday, 7 December 2014

In a stunning change of pace ... more cotton tea towels!

I ordered more Lily Sugar n' Cream yarn because I had a plan to work up a few more sets of cotton tea towels using that same Craftsy pattern by Angela Tong.  I have to say that the cost of the class has been more than amply repaid by the enjoyment I have had in making my multiplicity of tea towels.

On a recent trip to Columbus I visited a Jo-Ann store looking for cotton yarn, and I stumbled into the motherlode of Lily Sugar n' Cream yarn - - the store had lots of colourways that I simply could not buy online in Canada, like purples and blues, as well as scented yarn (that I most assuredly did NOT purchase) and other novelty yarns.

Because I have impulse control issues (!), I picked up a couple of balls in several colours as well as a couple of 14 oz cones of white cotton for the base.  This allowed me to weave yet another set of tea towels last weekend.

For my first pair of towels I used Lily Sugar n' Cream in white and a variegated pink.  The pink yarn has a very gradual colour change and ranges from an off-cream to deep pink, so the colour demarcation between the white and contrasting colour was not as sharp as, for example, the Cascade Luna blue or purple.  But the colour is still lovely and bright and I quite liked this combination.


I took a risk for the second pair of towels and was partially pleased with the result.  On my last trip to Romni Wools I picked up a couple of skeins of interesting cotton yarn with a view of using them in tea towels.  The first one I tried was Sakura cotton yarn blend (50% cotton, 30% viscose and 20% silk) in "Minami", which transitions in colour from ivory to beige-brown to pink to denim blue.  This was another yarn with a very gradual change in colour, and the ivory to beige shift was too close to the base white for my liking.

This yarn has a definite variation in it, with parts being thicker and other parts being so thin I feared for the integrity of my warp.  The yarn also had an irritating tendency to twist, which made for a challenging time keeping clean edges and required constant warp maintenance to untangle twists whenever I rolled my work to the front beam.  I liked the yarn more after washing, though, since it fluffed up nicely and filled in all the gaps I had initially seen when the towels first came off the loom.  I am a little concerned about the yarn's durability however, because the fringes started to almost disintegrate after the most delicate of washing - - OK for a decorative towel, perhaps, but not a good sign for an every day towel that someone will frequently wash.

I couldn't imagine working with this yarn again it was such a pain in the ass to work with so I trashed the leftovers.  I am also very leery about using the second skein of Sakura yarn (in a different blend) that I picked up at the same time, for the same reasons.


One new thing for me was to fold my loom and put it into its travel bag with a project still on it - - we departed Columbus after I had just begun to weave (but not yet finished) the white/pink towels, and the Kromski Harp loom worked perfectly, just as advertised.  I loosened the tension on the front and back beams and simply released the catches and the loom practically folded itself up.  A little shuckling back and forth was all it took to fit into the travel bag, which had lots of room for my loom and accessories like heddles, pick up sticks, bobbin winder, bobbins, and bag of tools.   

Overall I am pleased with the weavability of the Lily Sugar n' Cream cotton yarn, and am adding to my stack of gift towels as ammunition for the holidays.  These are a fun, quick, project.

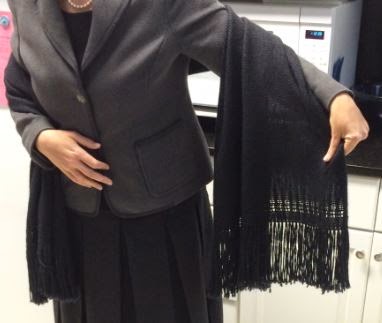
Shawl with Edge Detailing in Silky Baby Llama Wool

I had dinner with a dear close friend of mine last month and her response when I told her that I had taken up weaving was to tell me that she would absolutely cherish a wrap in a dark charcoal colour.  Because I dislike making things for me and love making things for other people, this seemed like the perfect opportunity to try a larger project.  Challenge accepted!

After much consideration, I chose Illimani's Silky Baby Llama (70% baby llama and 30% mulberry silk) in a dark grey that looks almost black.  The Nerd and I went to Romni Wools on an expedition to find wool for this shawl and their selection is truly awe-inspiring.  They almost had too much wool, if such a thing can be said, because although their breadth of selection was wonderful, the depth in any given colourway was a little shallower.  I was able to pick up the 10 skeins I thought I would need for this project, however, so they had enough for me (which is all that counts). 

I tried to estimate how much wool I would need based on the size of my finished project.  I planned initially on using a 12-dent heddle across all 32" of my loom with 100" warp to try and get a total length of 70" and width of 28" after draw-in and shrinkage.  When I got home with the wool, however, I ended up using the 10-dent heddle instead, so I ended up with some skeins left over (rather than requiring around 2100 yards I probably only needed about 1700 - 1800 yards of wool when all was said in done due to the change in heedle).

This was my first experience using the absolute maximum width of my loom (in a single heddle configuration), and it worked pretty well, with a couple of things learned.

First, the warp was long enough that it was quite bulky on the back beam after I tensioned everything, and during weaving some of my outer warp threads on one side "fell off" the mass thereby causing a minor sudden loss of tension in one warp thread.  It was easily manually corrected, however, and did not appear to compromise the finished work.

Second, I discovered that all of my pick up sticks that came with my loom (or purchased separately) were just short of the full width of my reed.   This I discovered early on because my plan for this project was to incorporate a 1 x 1 leno with a Brooks Bouquet near each edge - -trying to set up the leno with two pick up sticks for length was tricky.  This was only a problem for the leading edge of the work, because by the time I reached the far end the Nerd had made me an absolutely beautiful pick up stick in red oak that was the perfect length.  Now I suddenly want to do a lot of projects with pick up sticks for some reason. 

The actual weaving of this project was pretty quick even with the fussiness on the edges because the majority of the work was done in a simple tabby weave.  All in all, it took less than a week to complete this project, although I did do a very late night on my final night because the Nerd and I were travelling to visit family the next day. 

The finished shawl after washing netted out to 29" wide (slightly wider than the planned 28") and 70" long for the body of the shawl not including several inches of fringe - - exactly on plan.  In hindsight that 70" feels a little short and I may go a bit longer for my next shawl as a result. 

This wool wove up smoothly and well, and the wool is aptly named because it feels very silky to the touch, but it also sheds quite a bit, at least initially, so I am uncertain of the utility of using this wool for a different project like a scarf that requires more durability.  But I would love to work with this wool again, so maybe I will use it regardless, just because.


All in all I love this shawl and I hope my friend enjoys it too.  It was very satisfying to weave up because the simple weave meant that I could weave up several inches a night - - a far cry from my knitting days, for sure!  Given that it took a week to make it was not quite immediate gratification, but it was immediate gratification enough for me. 


Saturday, 6 December 2014

Super Easy Cotton Tea Towels - Part II

I really enjoyed weaving up the cotton tea towel described in Angela Tong's Craftsy video - - the pattern is simple yet classic and clean, and the project can be easily completed in only one day from start to finish.

The original pattern called for Lily Sugar n' Cream cotton yarn in white and green twist and that is a lovely combination.  But alas, it is not a super common yarn for some of my local Toronto high-end wool shops.  I ordered more of this yarn online from Yarnspirations, but in the meantime cast about for another cotton yarn that would weave up well and that I could find in my local wool-a-teria.

The solution - - Cascade Luna cotton yarn.  The yarn has a beautiful curl/twist to it, feels wonderfully soft after washing, and weaves up a treat, nice and smooth and even.


I bought almost all the white my local store had, as well as a supply of beautiful hand-dyed blue.  My partner The Nerd also picked up additional colours of this yarn as a Christmas present, including a beautiful rich variegated purple and a green - - lovely!  I started weaving with the white and blue shown above, then added a set of the white and purple the next day.


As with the original Lily Sugar n' Cream towels, I warped the Cascade Luna onto my Kromski Harp using my 8-dent heddle and finished with a hemstitch.  The towels are somewhat airy when first woven, but after washing they fluff up in a most satisfying way that is deliciously soft on the skin.

 I frankly love this pattern and plan on using it for my 2014 range of gift towels (for stocking stuffers or as Christmas gifts, or for single towels as hostess gifts when we are invited to parties).  I plan on doing a few more sets of towels using the Craftsy pattern, and then I will switch to something else for next season.  It would not do to get bored with weaving simply because I went crazy making one particular tea towel pattern on an industrial scale!


I have already given away the set of white/blue towels as hostess gifts at two different events this month, and each was very well received.  I have already woven up a replacement white/blue towel with my incremental Christmas yarn, even though I technically should have been saving it for after Christmas.  Humbug on that, I say!  Immediate gratification all the way!

Sunday, 16 November 2014

Double Heddle Doubleweave

The arrival of my second heddle meant that I was free to try more complicated works on my rigid heddle loom including double weave.  I have to confess that I fell in love with the weaving porn shown on the cover of Jennifer Moore's beautiful Doubleweave book, and the second heddle was largely driven by my desire to create something so intricate. 

But since I am still a beginner weaver, baby steps were in order.  Step 1 was to try a bit of a sampler in doubleweave in the form of a shuttle holder.  As it happens I found a truly excellent instruction online from the Ashford site, extremely well illustrated with clear step by step instructions and photographs of every step in the process.  This tutorial really helped me to overcome my fear of doubleweave, and helped me to work through some of my many issues with the technique. 

For this project I picked up some lovely hand-dyed 100% superwash Merino wool from Tanis Fiber Arts in Natural (ivory) and Iris (gorgeous variegated purple).  Each skein contains 260 yards, which actually goes quite a long way in a project like this - - using my 8-dent heddles I ultimately went through 2 skeins of each colour, 1 for each of my attempts and I had a lot of loom waste the second time around (mostly because I was tired of weaving this pattern and cut it off short).  


In my first attempt I warped my loom in the usual way and did not pay particular attention to the order of the colours of my warp threads with the (perhaps not unexpected result) that I had many many crossed warp threads and no real sheds to speak of as a result when I tried to place my pick up sticks.

So I went back to the drawing board and took everything off the loom and started from scratch, this time paying exquisitely close attention to the position of my warp threads relative to each other so that crossed warp threads were minimized.  In fact, so paranoid was I about policing my warp that I actually did the entire threading process one slot and hole at a time even before I wound my warp onto the back beam.  Labour intensive?  Check.  Practical?  Hell no.  But it did help me to better understand what I was trying to do with the warp and it definitely helped me to get some beautiful clean sheds once I began to place my pickup sticks. 


My first attempt was a first on many levels for me.  It was my first attempt at using two heddles; it was my first time using pickup sticks; and it was my first time attempting to create two layers of cloth at once.  I think it shows a certain defect in my personality that I consider this to be "baby steps". 


This first project taught me many things about weaving in two layers.  First and foremost I learned to be very careful about what is happening underneath, because you cannot easily see that bottom layer.  In my first piece I actually dropped several warp threads off my pickup stick somehow and my shuttles were as a result catching threads about .25cm in from the edge, and it took me so long to notice this that it was impossible to go back and fix it.  Whups!

Once I realized this I took to using a guide stick to help me place my shuttle correctly in each pick, and to help ensure I was not missing any warp threads.  My weaving immediately got cleaner after this (although still full of errors).  My weaving also immediately began taking much much longer. 

My first layers!
Still, I was pretty happy with this first work which was always intended to be a learning piece.  I managed to create a functional (if primitive) work that did, in fact, have multiple layers.  I learned how to create Brooks Bouquet as an added decorative element (it's much easier than it looks), and I learned and improved as I went along.  

But wow, were there a ton of mistakes in the weave.  I know that errors are kind of my identifying characteristic, but this first doubleweave swatch took the tradition a little far, even for me.  The work was not quite as bad as my very first piece, but it was not as clean as it could be by a far stretch. 

So I started a new piece, intending to try even more new things.  Because heck, why not?

The first innovation was in setting up my warp.  Remember back on my first houndstooth runner when I laboriously tied up each and every individual pair of warp threads in each colour?  Yeah, I knew there had to be a better way, and in fact, there is.  Simply by holding two colours in your hand separated by one of your fingers you can wind the warp around the warping pegs as required without ever tying off the individual colours.  The warp threads have a propensity to twist more or less depending on how many corners you incorporate into your warping board plan, but the twisting is all on the side of the balls of wool, not on the warping board itself.  Using this technique the only time I tied a colour off was when I started and then when I finished by warp - - this made a huge difference in the time it took me to set up my warp, and I will definitely warp colours this way from now on.

Add caption
The next innovation was discovering that I could entirely reverse my colours using a different combination of pickup sticks. 

On my first piece I always had ivory on the top layer and the variegated purple on the bottom layer because that was what happened naturally the way I strung my warp and oriented the pickup sticks as instructed in the Ashford tutorial.

I knew that it was possible to switch the top colour of a doubleweave work on a 4-shaft loom and I assumed that this was impossible on a double heddle loom.  Not so!  It just takes a different configuration of pickup sticks and different combination of heddling up and down compared to the first pattern, something I discovered in Jane Patrick's wonderful The Weaver's Idea Book

For example the ivory-top/purple-bottom pattern required a pickup stick under all the ivory warp threads and a pickup stick in the shed created underneath when the first pickup stick was turned up, combined with a front heddle up / back heddle down pattern.  In contrast, the purple-top/ivory-bottom pattern required a pickup stick under all the purple warp threads (and second pickup stick in the resulting shed), with a back heddle up / front heddle down pattern.  It almost blew my mind when I made the switch and saw the colour change - - I had no idea I could do this, but I was delighted. 

I tried to have all 4 pickup sticks sitting in back of the loom at the same time and this did not work at all for me - - the first set and second set would not float over one another the way the two of each set floated over one another, so I found it easier simply to remove the one set of pickup sticks and replace it with the second set entirely.  This also helped me as at times despite my best efforts the warp threads got tangled, and I was able to straighten things out on the changeovers, something that was impossible to do when the pickup sticks were holding the warp threads in place. 

Take 2
My second attempt was much cleaner, even though I did not do the ultra-high maintenance method of warping that I did the first time.  I was more attentive to the order of my warp threads as I threaded my heddles and I attempted to keep twisted threads to a minimum, but all in all it was pretty quick to warp up the loom this time, especially using the 2-colours at once technique. 


I love the fact that I can do doubleweave on my rigid heddle loom and I can see many possibilities to this technique, not the least of which is the possibility of effectively doubling the width of my 32" loom by joining the work on one side.

But I would be lying if I said that this was my favourite technique.  Doubleweave is extremely labour intensive, because you are effectively weaving twice the length of fabric at the same time, which means that it takes twice as long to weave each inch of finished fabric.  Plus it is a very fussy technique with a lot of checking and cross checking required to keep the bottom layer as clean as possible. 

All in all, however, I am very pleased with this project and everything I learned on it.   I like the look of the finished shuttle holder and even though doubleweave is a complex technique, it is easier than it looks, really. 

I will keep working on my technique though before I try that doubleweave on the cover of Jennifer Moore's Doubleweave book - - my skills are nowhere near ready for that yet!


Saturday, 8 November 2014

Project: Fabulous easy cotton tea towels

Last week's project was taken from Angela Tong's Rigid Heddle Weaving video class on Craftsy.  The class is useful because the instructor breaks everything down, from a worksheet with yardages and ends already calculated, to step by step instructions for finishing including hemstitching.  For  a beginner weaver like me this is very useful.

The tea towel project called for Lily Sugar n' Cream cotton yarn - - one 14 oz cone of white and 2 x 57g balls of Green Twists.  I was initially a little concerned about how this yarn would work up as the white cotton in particular felt a little abrasive on the cone, but my concerns were all for naught - - this yarn worked up a treat, was super easy to work with, had only manageable tangles, and is very absorbent as it turns out - - perfect for towels.  My only complaint is the rather limited colourways available in the Twists line of yarns - - I would love to repeat this same pattern with blues or purples, but the Twists line favours more of the red and brown shades. I ended up with about 1/3 of a ball of the green and a decent portion of the white cone leftover after I finished the project, so I was pleased not to have run out of yarn at any point. 

The video instructions were very clear and the pattern was quick to set up using my warping board built into the Kromski Harp.  I made a minor mistake transferring my first warp to my heddle (I built the warp in two sections) - - I inadvertently started at the wrong side so I had an extra pair of ends on one side that I had to move to the other to get the pattern to work out.  All in all I have made more catastrophic mistakes and this one was comparatively minor and it didn't slow me down too much.


All ready to weave

The instructions for these towels call for alternating 3" sections of white with 1.5" sections of green, with the ends hemstitched.  This was my first attempt at hemstitching, and it was a little - er - rugged on my first edge.  By the second towel, however, I was beginning to get the hang of it and the edges looked much cleaner and more consistent.  I really like the look of the hemstitched edge and will likely incorporate this into more of my projects. 


I love the simple clean lines of these towels.  The pattern is perfect for a kitchen towel - - not too fussy. 

The pattern called for setting up a 2.5 yard warp and weaving both towels on the same warp using waste yarn in between to separate the towels.  It worked perfectly, and I was delighted with how quick and easy it was to weave up two towels once the hard work of warping the loom was done. 

Fresh off the loom, before washing and trimming
The selvedges on my second towel were much cleaner because in part my leftmost warp thread was lying more flush with the other warp threads - - I think given the length of warp wound around at the beginning the warp threads may have rolled over or been otherwise separated somehow, which made for one messy edge on that first towel. 

Tea towels before washing

On my first towel I simply changed bobbins on my boat shuttles when the yarn ran out, which led to some sections having multiple yarn ends woven in.  Although this is not really a problem, I don't like the effect that the woven in ends has on my pattern, and I think moving forward I will switch to fresh bobbins to avoid running out in the middle of a colour block.  I did this for the second towel and liked the result much better. 


I also learned about running out of thread when the finishing edge of the first towel.  Because I had not started with a fresh shuttle before weaving my last section of white. by the time I reached the end of the towel there was comparatively little yarn left available for hemstitching the far edge.  In fact, I ran out halfway through hemstitching that edge, which meant that I had to tie in a new thread (and weave in extra ends as a result).  It was not a fatal error, but it was a useful reminder why it is helpful to have a fresh bobbin for that final section.  Because I had a fresh bobbin before starting the final section of the second towel I did not run out and in fact had lots of yarn to spare for hemstitching. 

I really really enjoyed this project.  The finished towels came off the loom at 25.5" x 14.5" and they were both essentially identical in size, which I really liked.  After washing and drying the towels shrunk down to about 21.75" x 13" - - as with the houndstooth runner I am seeing much more shrinkage on the length than the width of my finished projects.

Finished towel action shot - after washing and trimming
I am keeping these towels for us to use in our kitchen because even though they look pretty good, they are still liberally sprinkled with enough errors (aka "character") that I am uncomfortable gifting these to anyone.  But I really want to do this pattern again because I am sure the second time around will be that much better. 


Monday, 3 November 2014

I love me some houndstooth table runner action

After a supremely frustrating experiment in Log Cabin weaving I went back to my roots with another houndstooth table runner, this time using the 5/2 mercerized cotton yarn in Bermuda Blue and Purple on a 12-dent heddle.

I set up the warping board on my floor stand and it worked great!  The way I set up my warp for houndstooth is very time consuming as I knot the individual colours, but it really helps keep my warp threads nice and clean when I am weaving - - there is minimal crossing behind the heddle.


I planned this project out ahead of time in an attempt to better know what my finished project should look like, using a worksheet downloaded from <craftsy.com>.  I wanted to get 90" of length including fringe, and factored in 15% take up and shrinkage for a total length of 120", which is what I attempted to set up on my warping board.  As for the width I wanted 12" finished width, so I initially warped across 168 ends, or 12 dpi x 14".

Ready to weave
Cleaning the warp threads as I wound them on the back beam took the longest time, because there was about 10' of distance in a slick yarn that just loved to tangle.  I ended up losing some of my warp length by having to trim my yarn ends, which were excessively prone to tangling.

It took me most of a day to set up my warp.  On the plus side, I got an extra hour of work time around 2 am because I was still hard at it when we set our clocks 1 hour back.  So productive!

Once I began weaving, the piece took shape very quickly.  In less than a full day I finished weaving the runner.


When I took the work off the loom I discovered that the woven piece measured 78.5" x 12.75", which is interesting.  I see now how much warp length I lost by having to trim out the knots at the bottom of my threads, because although the width was much closer to my planned width (all measurements prior to washing) the length was much shorter than planned.  

As for the pattern itself, I was very happy with how it turned out:

The colours are nice and rich, and although this is still a very airy weave (even using the 12-dent heddle), I love the look of it.  We will see how it washes up.

I will update this post once I wash the piece and will know how much it shrinks. 

EDITED TO ADD:
After washing the runner came down to 75.5" x 12" (from 78.5" x 12.75").  The finished runner looks great!  It is going in someone's stocking for the holidays for sure!

I have seen the enemy and it is Log Cabin weaving

I have to admit to my complete and utter failure to weave an adequate Log Cabin pattern on my rigid heddle loom.  Well perhaps I exaggerate for effect.  If it was not a complete and utter failure at the very least it did not go as planned. 

With the arrival of my new 12-dent heddle I could now warp my loom with a higher contrast 5/2 mercerized cotton yarn in Bermuda Blue and Purple.  The colours were lovely and rich looking in the light, and I had high hopes for sufficient contrast to permit the Log Cabin loveliness to shine through.

Things fell off the rails when it came time to begin weaving.  I didn't know if I should be running a pick of the light colour AND a pick of the dark colour with the heddle in each position, or if I should be simply alternating the colours.  A Craftsy instructional video by Deborah Jarchow seemed to suggest that one should run both colours through the shed when the heddle is in each position, but all the charts I found on the internet suggest that one simply alternates colours.  In the end, I tried both ways, and I think that the alternating picks of colour with the heddle moving up and down is the way to go.

I threaded by heddle using the skipping slot technique I saw on Bon Tricot's blog, and was really pleased with the result - - I had many fewer crossed warp threads than in my first attempt (in the usual style).  That part worked well.

Detail showing the skipped slots and holes


What didn't work?  I kept losing track of my counts and lost my pattern over and over again.  The same thing happens to me when I golf - - am I lying 3 or hitting 3 - - I can never remember.  Have I just raised the heddle so now it's time for a light pick, or should I be lowering my heddle and doing a dark pick?  I could usually muddle along and figure out the colour, but I can see from my result that I kept forgetting whether I should be working on an up shed or a down shed. 

I tried both methods of Log Cabin weaving, both the 2 colours through 1 shed technique and alternating colours and sheds, and the latter came closest to replicating the pattern for me.  If I hadn't kept losing count, it might have been the way to go.  You can see from the example below that my various sections looked more and less Log Cabin-y, depending on my technique and accuracy.

So much for consistency...


So this was largely a frustrating exercise.  Some positive strides in threading my heddle and setting up my warp, but many many small frustrations in trying to make the pattern. 

So many mistakes...!  Don't weave while distracted, kids!


I am sure I am just having a minor block, and that one day all will be clear to me with more practice.  For now I will go back to a nice houndstooth pattern in the same blue and purple yarn just so I have the positive reinforcement of completing a project.