Showing posts with label 3/2 mercerized cotton. Show all posts

Wednesday, 31 December 2014

Sampler: 1/3 Twill on a Rigid Heddle Loom

My sampler of textures went so well that I was tempted to try something more ambitious that I have wanted to do for some time - - a twill.

It is definitely possible (and quite straightforward) to do a 1/3 twill on a rigid heddle loom using 2 heddles, a pick up stick, and a set of string heddles (or second pick up stick).  I say "quite straightforward" after I did what I should have done from the beginning - - consulted a book.  Jane Patrick's excellent The Weaver's Idea Book has a clear and detailed explanation of how to weave 1/3 twill on a rigid heddle loom.  Alas, Patrick's book was the second one I consulted - - the first was David Xenakis' The Xenakis Technique, which I have yet to understand in even the tiniest way.   Others have raved about this book, but I just cannot parse it at all for some reason.  Not only did I feel stupid for not understanding this book, I only confused myself beyond all understanding, getting more and more frustrated in the process.

The Xenakis book was no help, and a review of several blog posts and message boards about twill only confused me to the point that I was ready to scrap the entire project.  I tried a couple of different ways to thread my heddle, but without a clear idea of the treadling sequence, I was really just fumbling around in the dark.  Completely ineffectually, I might add.

I decided to sleep on things and in the meantime my partner the Nerd tried a new version of a 1/3 twill using the Xenakis book (which he understands much more than me).  He had long floats in his work from his fourth warp thread in each series, but there was definitely a twill pattern there, which gave me hope.  Reinvigorated, I picked up the Patrick book (which I should have done at the beginning), and sure enough, on page 191 were detailed instructions for tying up a 1/3 twill, complete with full treadling instructions.

Here's where the simple stuff comes in.  Patrick has a nice clear drawing for how the two heddles should be threaded.  My only complaint is that her drawing is upside down to me, since I thread my back heddle first.  Here is the threading sequence seen from the front looking back (rather than from the back looking front, as in Patrick's book):

Working from left to right across the rear heddle thread #1 goes in a slot, and thread #2 goes into the hole immediately to the right.  Threads #3 and #4 both go in the next slot immediately to the right.  The next hold is skipped, and then the pattern repeats across the reed, with the next thread being placed in the first slot to the right of the skipped hole.

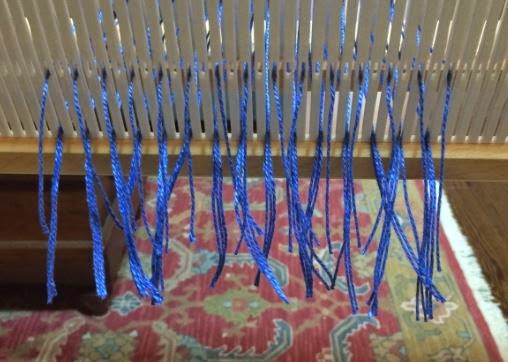
For the front heddle, the first three threads (from the first slot (#1), the hole (#2), and the left-most thread of the second slot (#3)) all go into the slot directly under the slot with the double threads on the rear heddle, as shown above.  The right-hand thread from the second slot (thread #4) goes into the hole to the right of the 3 threads just placed.  The next slot and hole are then skipped, and the pattern repeats again. 

Here's how the rear heddle looked on my loom:

And here's how the front heddle looked:

All together now:

Placing the first pick up stick was simple.  I placed both heddles in the down position, then picked up the left thread of each pair, alternating 1 up x 1 down across the reed.
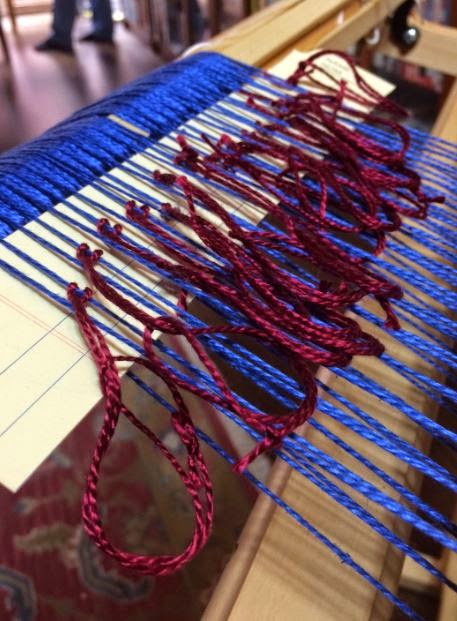
Patrick recommends using a string heddle rather than a second pick up stick for the 1/3 twill, so that's what I did for this sampler.  You can see the strings for the heddle in place (without the stick).  For this sample I attached the string heddle to the right thread in each pair, that is, the thread not already picked up by my first pick up stick.


It was a very simple matter to attach the string heddles to a length of dowel cut for the purpose.  This photo is somewhat misleading as I actually moved my pick up stick to behind the string heddles before I started weaving, but this photo clearly shows how the string heddles and the pick up stick lift alternating warp threads.

[If I were some bloggers, this is where I would stop, leaving the whole treadling sequence as some elaborate mystery.  Elaborate mysteries suck, though, so I'm not going to do that.] 

Ironically enough the Nerd and I stumbled across the proper treadling sequence in our trial and error efforts, we just didn't know it.  Patrick confirms that the proper sequence is:
     Row 1: front heddle up
     Row 2: heddles in neutral, pick up stick [A]
     Row 3: back heddle up
     Row 4: heddles in neutral, string heddles / pick up stick [B]

And that's all it takes (!).  This produces a 1/3 twill with weft floats that appear to move diagonally up and to the right, as shown in the bottom portion of the photo below.

It's just as simple to reverse the direction of the twill by reversing the above sequence:
     Row 1: heddles in neutral, string heddles / pick up stick [B]
     Row 2: back heddle up
     Row 3: heddles in neutral, pick up stick [A]
     Row 4: front heddle up
This produces weft floats that appear to move diagonally up and to the left, as shown in the middle portion of the photo below. 


For this sampler I finished off with a simple basketweave that is made by simply weaving up and down with the front heddle only.  This produced a very dense, horizontal weave as shown in the top portion of the photo above. 

The pattern can also be seen on the reverse of the work:


Tuesday, 30 December 2014

Sampler: Rigid Heddle Pick Up Stick Patterns

Because tabby weave is all very well and good but a little - well - boring, I am learning new texture techniques for my Kromski Harp rigid heddle loom.

Over the holidays I picked up a fantastic book, Textures and Patterns for the Rigid Heddle Loom by Betty Linn Davenport, which is just chock-full of interesting patterns and techniques.  The copy I ordered from Amazon shipped in a day or two, and came complete with a signature by Betty Linn Davenport herself.  Her handwriting is just as lovely as you would expect from someone with a name like "Betty Linn Davenport".

I started small, with some simple weft floats.  For these patterns I inserted my pick up stick 1 up x 1 down (repeated), 2 up x 2 down (repeated) and 3 up x 3 down (repeated), working from right to left across the row.  Looking up from the bottom, the number of pattern rows in each series increased.  In each case these the pattern rows were worked with the heddle in the neutral position.

Weft Floats front (L) and back (R)

Moving on to warp floats, I did not change the position of my pick up stick.  This time the pattern row was woven with the heddle in the up position.  As with the weft floats, the patterns change from a single pattern row in a series to longer floats covering multiple rows.

Warp Floats front (L) and back (R)
Warp and weft floats are symmetrical, in that if you float your weft on one side, you get a floating warp on the reverse, and vice-versa.  So no, I did not simply repeat the first set of photos and reverse the order, although it certainly looks like I could have.

Now came the time for some lace weaves.  I started with a simple 3/1 lace for which the pick up stick was set 1 up x 1 down all the way across the row.  This pattern, like the weft float it is based on, used the pick up stick in the neutral position for the pattern row, with 1 pattern row (row 2) and 3 plain weave rows (rows 1, 3, and 4).

3/1 Lace front (L) and back (R)
I liked the texture of the 3/1 lace, both on the front and the back of the piece, although the pattern was very subtle on the 3/2 mercerized cotton that I was using for this sampler.

The 5/1 lace is very similar in concept to the 3/1 lace, but in this case the pick up stick was set up as 1 up x 2 down across the row, and there were 2 pattern rows (rows 2 and 4) and 4 plain weave rows (rows 1, 3, 5, and 6).  I didn't like the look of this lace quite as much as the 3/1 lace, which has a certain symmetry I found lacking in the 5/1 lace.

5/1 Lace front (L) and back (R)
I also did some colour studies in my sampler such as an weft float in contrasting yarn, loom controlled inlay, and a couple of colour variations, but the purple I used as my contrast colour is very difficult to see (some would say impossible to see) against the bright royal blue of my background, so I am not including photos of these studies here.  Suffice it to say that I did these techniques, and while I liked the effect on the front of the work (although it would have been more impressive with a thicker contrast yarn), I did not like the big floats of contrast colour on the reverse side of the work.  These effects got a big "meh" from me, but they are likely very useful to know for the right work (perhaps for something lined so that the messy underside is hidden).

Another lovely pattern is the Double Huck Spot Weave created with 5/1 weft floats and 2 pick up sticks used in sequence.  The first pick up stick is inserted 4 up x 2 down across the row.  The pattern is then worked with a series of 6 rows, with rows 2 and 4 being pattern rows with the pick up stick in the neutral position, and rows 1, 3, 5, and 6 being plain weave.  Once this series is completed the second pick up stick is inserted 1 up (2 down x 4 up, repeated across the row), and the pattern of rows repeats, with the second pick up stick being used in the pattern rows just as the first was.
5/1 Weft Floats (Double Huck Spot Weave) front (L) and back (R)
I can see how someone would be tempted to set up the second pick up stick pattern using string heddles because it must be an almighty pain in the butt to have to remove and re-insert the second pick up stick every 6 pattern rows.  It was fun for my little sampler, but I can see how the novelty would wear off really quickly if weaving a larger piece.  Which is a pity, really, because it creates a lovely effect.

Another of my favourite textures, the Window Pane laces, are created by warp and weft floats.  The first is a 3/1 Window Pane, which uses a single pick up stick set 1 up x 1 down across the row.  Unlike the plain 3/1 lace, which used the same pick up stick setup but only had a single pattern row with the heddle in the neutral position, the 3/1 Window Pane has 2 pattern rows in the series (rows 2 and 5), the second of which was woven with the heddle in the up position. The remaining rows (rows 1, 3, 4, and 6) are plain weave.  This pattern creates a wonderful symmetrical effect that is virtually indistinguishable from the front to the back, and is very easy to weave.

3/1 Floats (Window Pane) front (L) and back (R)
The 5/1 Window Pane also produces a very interesting effect, and although it is not symmetrical from front to back like the 3/1 Window Pane, the back is pretty in its own way.  This pattern is woven, like the 5/1 lace, with a single pick up stick set 1 up x 2 down, repeated across the row.  For this pattern there are 3 pattern rows (rows 2, 5, and 7) with the latter two pattern rows being woven with the heddle in the up position.  The remaining rows (rows 1, 3, 4, 6, and 8) are plain weave.

5/1 Floats (Window Pane) front (L) and back (R)
I also played with my new tassel twister because hey, why not?  It worked great, and I can see how it would produce a lovely effect on longer fringes (rather than the stumpy little fringe-ettes I had in my sampler).


So all in all it was a fruitful evening spent learning many interesting new textures.  I already have a few I would like to incorporate into my next throw, if not all the way through, certainly near the edges for interest.


Friday, 31 October 2014

New test - Log Cabin Weave and Using a Warping Board

Flush off the triumph of the hounds tooth table runner worked in 3/2 mercerized cotton yarn in red hot and garnet, I yearned to try a more complicated pattern - - Log Cabin.  I also wanted to try and use the Kromski Harp's built-in warping board rather than direct warping the loom as I had done with the hounds tooth, as direct warping takes forever (for me at least, because my warp threads keep getting tangled). 


This time I watched a very instructive video from Craftsy - - Rigid Heddle Weaving with Angela Tong.  The step by step instructions in this video helped me overcome my fear of using the warping board, and I have to say that running the yarn around the pegs was much faster than my first attempts at direct warping. 


Even better, threading the yarn through the slots from my hand was amazingly quick and easy.  I was frankly stunned with the difference in time - - I suspect that I will be using the warping board from now on. 


I followed a pattern for a Log Cabin Weave posted on Craftsy in the video Rigid Heddle Weaving - Beyond the Basics with Deborah Jarchow.  I found this video as clear and easy to understand as the Angela Tong video, and I learned a lot about working with colours from this video.


I warped up my loom with the same 3/2 mercerized cotton yarns in red hot and garnet, not necessarily because I thought these had the best contrast (they had virtually none), but because these were almost the only yarns I had that would work on my 10-dent heddle.  As you can see when the loom was loaded up and ready to go, the difference in the two colours was very subtle indeed.


I was not thrilled with the way my yarn was crossing over itself on the back beam.  The Craftsy pattern called for the following slot order, with L representing the lighter yarn, and D representing the darker yarn:

L D L D L D L D L D L D L D L D L D L D L D L D L D D D L D L D L D L D L D L D D D L D L D L D L D L D L D L D L D 

This resulted in 116 ends, 31 pairs of D yarn and 27 pairs of L yarn.  Once the slots were threaded, I then had to rethread the heddle in the following pattern, with the upper row representing the holes and the bottom row representing the slots:


Left side of heddle      D D D D D D D D D D D D L L L L L L L D D D D D L L L
                                  L L L L L L L L L L L L D D D D D D D D L L L L D D D D


 D D D D L L L D D D D D L L L L L L L D D D D D D D D D D D D
L L L D D D D L L L L D D D D D D D D L L L L L L L L L L L           right side of heddle


It was this rethreading that resulted in a lot of crossed warp threads.  Deborah Jarchow's technique to deal with these is to push them to the back beam as the work is wound forward.  It seems like there must be a better way to manage this. 

I began following the pattern printed in the Craftsy class, and the first part of the pattern went well.  Things started to spiral off the rails quite quickly however - - I broke a warp thread, which, although easy enough to fix, was a supreme pain in the butt initially when I kept getting caught on it.  Second, it soon became clear that I could not really see the log cabin pattern at all:


There is just the merest hint of a pattern using these two yarns - - they are simply too close in shade to give the real pop of contrast demanded by this pattern. 


I see just the barest, most subtle pattern there, but it certainly isn't doing Log Cabin any justice.


And because mistakes come in multiples (at least with me), I began to lose the pattern - - the change between the first couple of pattern blocks worked fine because the pattern called for two picks of the darker colour so that both of my shuttles ended up on the same side - - when I started the next change the pattern only called for 1 pick of dark colour so my shuttles were on either side of my loom - - I'm not sure that was intentional. 


The pattern seemed straightforward enough, but I just didn't understand the colour changes and I couldn't see the colour changes, other than as the merest suggestion, so when I went off plan I had no real way of knowing.


As a test swatch, though (and only my third real project), this was still a useful exercise because I learned how to use my warping board, and I learned that contrast is everything with a Log Cabin weave.   The good news is that I finished up the sample piece quickly enough, and I am going to try the Log Cabin pattern again, only with a much more contrasting yarn next time. 


Thursday, 23 October 2014

Work 2 - Houndstooth Check Table Runner

Work 1 - - the primitive childlike weaving of incredible unevenness and unintentional loops - - went much better than expected, actually.  Along the way we discovered that part of my issues with keeping an even tension in my work were because our pawls were on the ratchets backwards so the gears kept slipping.  Good thing to discover on a piece of scrap work.

For work #2 I wanted to try a simple houndstooth check using a 2 x 2 pattern (2 warp threads of each colour and 2 picks of each colour, alternating one after the other).   I also wanted to try getting the tension right this time, so I really took my time setting up my warp.  I switched to a 10-dent heddle because the 8-dent heddle was very very airy using my 3/2 mercerized cotton yarn - - I kept the fiber the same as in work #1 because I liked the colours and thought that the red and garnet combination would still have an adequate contrast for the houndstooth. 

I used the single warping peg again this time to help set up the warp, because I thought that trying to play with tension, colour, and a completely new warping method was one innovation too many. 

I am almost certain that I set up my back end of my warp in the most labour intensive way possible, tying off knots on each end of each colour, all the way along the warp assist dowel.  This took literally hours.  I started on Saturday evening and finished Sunday around lunch time.  At first it just felt like it took forever, and then I started to get into a rhythm and the time seemed to pass faster.  Don't get me wrong - - it still took hours, I just didn't mind it as much.


With the pawls on facing the right way and using warp sticks I was able to maintain a nice tight tension on my warp while I wound the warp onto the back beam.  The next step was figuring out how to tie off my warp threads onto the front warp assist dowel.  The first time I set up my loom I used a giant loose bow because I couldn't figure out the knot that would permit me to adjust the tension. 

This time I watched more Tim Horchler videos on warping my loom and I called in an expert: the Nerd.  He was able to figure out the first knot, and he showed it to me.  It was really head smacking time - - it was so easy, a simple overhand knot!  D'oh!

These half knots permitted me to adjust the tension on my warp across the groups of warp threads, ensuring a much more even tension across the whole width of my warp.  It will come as a shock to no one when I tell you that these little knots have a much lower profile than big loopy bows (!), so they caused less bumpiness when I began winding the work onto the front beam.

Speaking of the bumpiness of winding over the knots on the front beam, this time I actually used warp sticks to help hold the finished weave up over the knots as I wound the fabric around the beam, and it helped keep my work much flatter in the working portion. 
With the warp nicely set up it was time to begin weaving, and this is where the fun began.  I am sure all practiced weavers will nod their heads when I say that it took me as long to set up the warp as it took me to weave the entire work. 

I loved the way that the houndstooth pattern wove up.  Once again the boat shuttles and preloaded bobbins work a treat - - it was so easy to swap out empty bobbins for preloaded bobbins as required. 


I started weaving just after lunch and finished weaving the length of the warp and knotting up the fringes by 10.30 pm.  I set up my warp initially across 12" of the heddle, 6" on either side of center.  Coming off the loom the finished work was about 11.5" wide x 45.25".  After washing the work shrunk up by about 8%, so that the new dimensions were 10.25" x 41.5".   

I wasn't trying to achieve a specific width or length because this was still a test project so it was a bit of a surprise to see the dimensions both when the work came off the loom and after washing.  I am beginning to see why we always need to add inches on the warp and weft to accommodate shrinkage and tightening of the woven fabric.

I am more convinced than ever than my next test work needs to be warped using the warping board rather than a single warping peg, to create a longer work.  I also found this work was still a bit airy so I might use a 12-dent heddle the next time I use the mercerized cotton yarn, or I may change to a different fiber. 

All in all I was extremely pleased with the result for work #2.  For another largely test project I thought it went pretty well.  My selvedges were pretty straight and even, the tension regular, and the pattern showed up nicely.  I wished the finished work had been a little bit longer, but that is the limitation of direct warping the loom. 

Tuesday, 21 October 2014

My first test swatch woven on a Kromski Harp rigid heddle loom

Understanding that I have impulse control issues (read: I have no impulse control), it was only a matter of time - - a very short amount of time - - before I had to take the new loom out for a test ride. 


For my first foray into weaving I simply used the basic 8-dent heddle that came with the loom, and some 3/2 mercerized cotton fiber in garnet and red hot.  I tried to choose a fiber with a gauge that would work well with an 8-dent heddle, but the fiber turned out to be a bit finer than I anticipated, which resulted in a very airy piece.

Detail of my first test swatch - - lots of space between the fibers

After watching numerous helpful videos on direct warping a rigid heddle loom using a warping peg, I was able to warp my loom, after a fashion.  Although I knew that it was important to get the tension even across the width of the warp, I was a little hazy on the recommended knots to use to tie the warp to my front dowel and hence the front beam, and I also failed to ensure that my dowel was parallel to the beam - - as a result, the tension on my first piece was very wonky to say the least. 

What worked?  The general manner of direct warping the loom by running the yarn around the dowel and through the heddle slots around the warping peg.  Also, the general mechanic of passing the boat shuttle back and forth worked very smoothly.  Loading the bobbins using the bobbin winder also worked really well. 

What didn't work so well?  First and foremost, my tension was all over the place in part because the back dowel was not parallel to the back beam when I began winding up the warp, and in part because the knots I used to tie the warp to the front dowel and thus the front beam were raggedy ass bows.  This created very uneven tension as between groups of warp threads as well as huge lumps in the fabric as I began winding the completed weaving onto the front beam. I also was too tentative when changing colours of weft thread, and as a result I had huge loops on my selvedge. 


 The result?  A delightfully primitive test swatch that shows off my almost complete lack of technique, but also shows promise -- the piece is definitely smoother and more consistent the farther along it goes as I got increasingly comfortable with the loom.

Although it really looks like my 10 year-old nieceling wove this piece, I am quite proud of it.  I found weaving to be easier than I expected, and I figured out how to do several things that had puzzled me when I saw them on videos or in books. 

Working on this swatch also made me very keen to try something more tricky (but still simple) - - a houndstooth check.  But that is a story for another day.