Showing posts with label tassels. Show all posts

Saturday, 4 March 2017

Project: Doubleweave Windpwpane Shawl

Woven: January - February 2016
Fiber: 8/2 tencel
Reed/Sett: 8-dent/32 epi

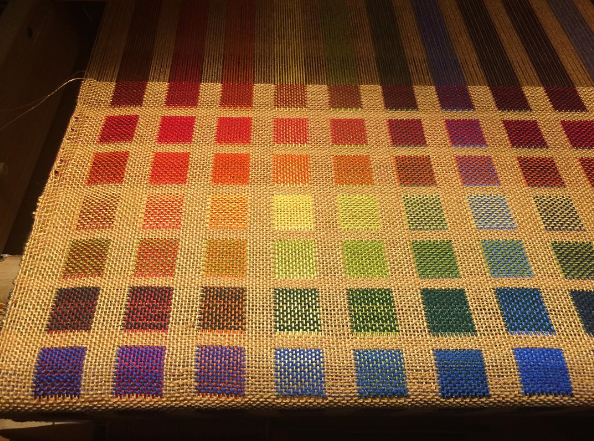
This project was a further development on the doubleweave baby blanket, and one that finally delivered on the weaving porn on the front of Jennifer Moore's excellent Doubleweave book.  My plan was to use her table runner pattern and weave a shawl in 8/2 tencel. 

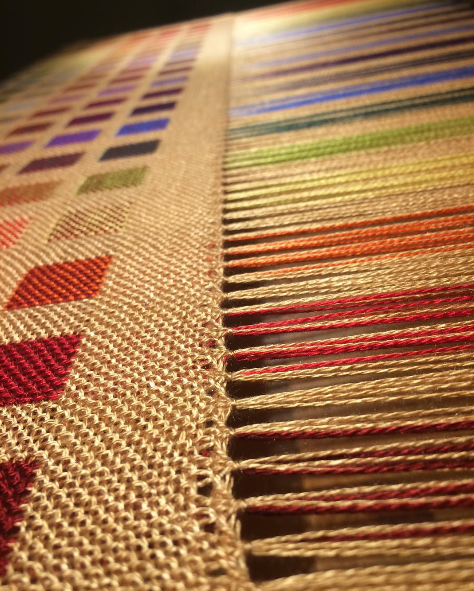
Before getting started I wove some samples to work on the technique.  Using 4 ends per slot in the reed (2 per layer) I started on the top with a 12-dent reed.  The finished product was so dense that it was almost rigid, which although fine for a very structured garment, was not ideal for a shawl.  The middle, long sample was woven with a 10-dent reed, and the bottom, widest sample was woven using the 8-dent reed.  For a shawl I thought the 8-dent sleyed at 4 ends per slot for 32 epi was the way to go.


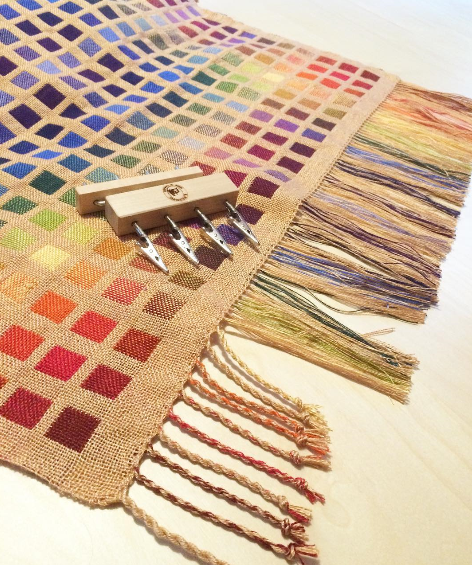
For my colours I chose a lustrous bronze as my base, with rainbow colours as my contrast blocks.  The plan was to mirror the pattern throughout the shawl. 
 
 
I used a temple to maintain my selvedges because draw-in without the temple causes by warp threads to snap.  With the temple, the weaving was very straightforward on the 8-shaft Louet Jane table loom.  The shawl was finished with twisted tassels, and after wet finishing (hand wash and dry flat) the finished shawl (exclusive of tassels) measured 23.5" x 72.5". 
 
For more information check out my website at deftlyweft.com or my instagram page at @the_meglg and @DeftlyWeft.


Saturday, 30 May 2015

Project: Houndstooth Shawl in Peruvian Wool


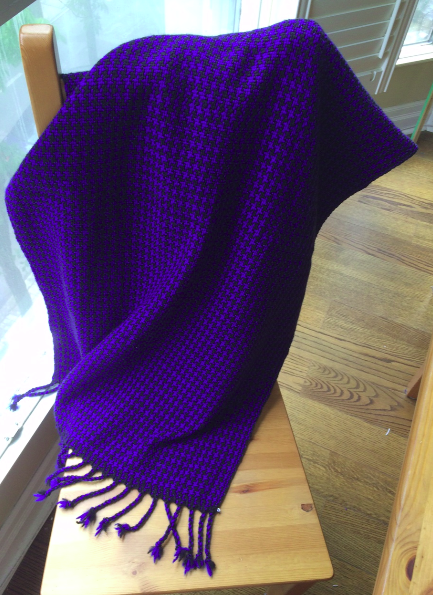
My most recent project is another one of my beloved houndstooth shawls.  This one is in a bold blue and black using Cascade 220 100% Peruvian Highland wool from Camilla Valley Farm.  The colours were Black #8555 and Blue Velvet #7818 (trust me, it is a rich royal blue, no matter how purple it is in the below photograph!).  I know I do a lot of houndstooth, but it's only because I love the pattern so much - - it's a true classic that looks good year after year. 
 
For this project I went through 4 x 100g skeins of each colour using my 8-dent heddle on my trusty Kromski Harp rigid heddle loom.


I measured out about 116" warp across 240 ends, alternating 2 ends of each colour across the reed, with the intention of working a standard 2 x 2 houndstooth. 

This wool is somewhat stretchy so I got a lot of mileage out of each skein, and it was very easy to work having comparatively few tangles when warping the loom, especially when compared to some of the "grippier" yarns I have worked with (like unmercerized cotton).

For finishing I hemstitched in bundles of 4 ends and then made 30 tassels of 2 x 4 ends each.  The alternating warp yarn created a really neat variegated look for each tassel.


Because houndstooth is a straight tabby weave the pattern actually weaves up pretty quickly, especially on an 8-dent heddle - - although probably not quite as quickly as shown in the video below!


The finished project measured 25 1/4" x 78 1/2" before washing and 24 1/2" x 77" after washing. 

Fresh off the loom before washing and finishing
Finished shawl after washing and finishing
I really enjoyed this project, and the wool was a pleasure to work with. 


I know my camera and the lighting does magical things with the colour of this shawl, but trust me that this is a royal blue and black houndstooth shawl (not purple and black, although that would look awesome too).  The above photo of the shawl over the chair back is probably the closest to the true colour of the photos in this set. 

Saturday, 3 January 2015

Project: Tasselled Shawl

The Nerd's mother is, alas, completely allergic to wool (a fact I discovered after knitting an entrelac shawl in silk, lamb wool and merino).  This is actually not that inconvenient because acrylics and cottons are generally: i) cheaper than the fancier wools I typically use; and ii) available in colours that the Nerd's mom likes.

Case in point with the current yarn.  Whilst shopping with the Nerd's mom last fall she cooed over some chunky variegated yarn in colours shifting from seafoam green to teal blue to purple - - basically all of her favourite colours.  I opportunistically picked up a few balls of this chunky wool, and fortunately remembered to look for some appropriate yarn to use as a complementary warp (although in hindsight, not enough, sadly).

The result: Red Heart "Soft" 100% acrylic yarn in a seafoam green (the colour doesn't show up well in the photo due to the poor lighting) as my warp yarn, combined with the Lion Brand Homespun Thick & Quick yarn (88% acrylic and 12% polyester) for the weft.  No living animals were harmed or even made the tiniest bit chilly in the making of this shawl (!).

Given the heft of this yarn I opted to work with my 8-dent heddle.  I only had 2 balls of the Red Heart warp yarn, which was enough to warp across 156 ends at 100+ inches.  I was hoping to do something shawl-like, or at the very least, a really generous scarf. 

One thing I discovered very quickly was that the Lion Brand, while a great weft yarn, is terrible at holding up under pressure.  I initially tried working my hemstitch in the Lion Brand yarn but it literally shredded under the pressure of being pulled through the fabric within a few stitches.  Thankfully I had some remnant Red Heart yarn left over from my warp, which turned out to be just enough to do the hemstitching on both ends of the piece - - with centimeters to spare.  Whew!  The seafoam colour of the Red Heart actually worked perfectly with the colours of the Lion Brand weft yarn, and I am very happy with how the colours played out.


I have to tell you that this wool weaves up lickety split.  From start to finish this entire project took less than a single day.  God bless chunky yarns!


Because the Lion Heart weft yarn was so damn chunky, I had to forgo my usual boat shuttle in favour of the stick shuttle.  This actually worked pretty well, all things considered, but given the nature of the yarn and the fact that the colour changed along the length, I actually had to load my shuttle twice each time - - once to get the right amount of yarn on the shuttle, and then a second time to unwind the yarn from the first shuttle onto a second shuttle so that the beginning of the new shuttle was the same colour as the end of the working shuttle.

Otherwise, I quickly discovered that what may start out as purple when winding the shuttle shifted to teal and seafoam by the end of the shuttle - - without reversing the shuttle I would be going from my last pick of purple to a new pick of seafoam in the middle of a row, which would look terrible.  Since I didn't want any dramatic colour changes in the finished piece, I had to make sure that I was following the colours as they came off the ball. This is not to say that there are not still sharp colour changes, but I can honestly say that these all come from the yarn itself and how the colours are combined, not from my shuttle changes.  This posed additional problems when I was changing from one ball to another, but as it happens I finished on a purple area and after starting my next shuttle with seafoam at the beginning of the next ball, the yarn colour had shifted to purple by the end of the shuttle, so I was able to simply start from that point (without having to reverse the shuttles).


Because I only had 2 balls of my warp yarn, the piece was not as wide as I usually prefer, but it was much longer than I expected coming off the loom - - the thing was huge!  Fresh off the loom the thing could wrap around me multiple times.  This was very different from my pure wool shawls, which have much less stretch to them. 

Fortunately, washing and drying the piece on high heat shrunk it up, but it is still easily the longest piece I have done to date.  The finished work measures 17.25" x 79.5".  I am actually not too unhappy with the finished dimensions.

In the photo below you can really see the colour changes that happen with this yarn:


I used my tassel twister to clean up the fringe at the ends, which adds an interesting look to the finished shawl.


After washing the shawl is very soft to the touch, and it is certainly warm and cozy.  I hope the Nerd's mom likes it when I give it to her, likely for her birthday.  Or as a hostess gift the next time we go down to visit them.

Although I am still not a huge fan of unnatural fibers (I am such a snob!), I have to admit that the I like the colour, texture and feel of the finished work.  Perhaps I am being converted.


Tuesday, 30 December 2014

Sampler: Rigid Heddle Pick Up Stick Patterns

Because tabby weave is all very well and good but a little - well - boring, I am learning new texture techniques for my Kromski Harp rigid heddle loom.

Over the holidays I picked up a fantastic book, Textures and Patterns for the Rigid Heddle Loom by Betty Linn Davenport, which is just chock-full of interesting patterns and techniques.  The copy I ordered from Amazon shipped in a day or two, and came complete with a signature by Betty Linn Davenport herself.  Her handwriting is just as lovely as you would expect from someone with a name like "Betty Linn Davenport".

I started small, with some simple weft floats.  For these patterns I inserted my pick up stick 1 up x 1 down (repeated), 2 up x 2 down (repeated) and 3 up x 3 down (repeated), working from right to left across the row.  Looking up from the bottom, the number of pattern rows in each series increased.  In each case these the pattern rows were worked with the heddle in the neutral position.

Weft Floats front (L) and back (R)

Moving on to warp floats, I did not change the position of my pick up stick.  This time the pattern row was woven with the heddle in the up position.  As with the weft floats, the patterns change from a single pattern row in a series to longer floats covering multiple rows.

Warp Floats front (L) and back (R)
Warp and weft floats are symmetrical, in that if you float your weft on one side, you get a floating warp on the reverse, and vice-versa.  So no, I did not simply repeat the first set of photos and reverse the order, although it certainly looks like I could have.

Now came the time for some lace weaves.  I started with a simple 3/1 lace for which the pick up stick was set 1 up x 1 down all the way across the row.  This pattern, like the weft float it is based on, used the pick up stick in the neutral position for the pattern row, with 1 pattern row (row 2) and 3 plain weave rows (rows 1, 3, and 4).

3/1 Lace front (L) and back (R)
I liked the texture of the 3/1 lace, both on the front and the back of the piece, although the pattern was very subtle on the 3/2 mercerized cotton that I was using for this sampler.

The 5/1 lace is very similar in concept to the 3/1 lace, but in this case the pick up stick was set up as 1 up x 2 down across the row, and there were 2 pattern rows (rows 2 and 4) and 4 plain weave rows (rows 1, 3, 5, and 6).  I didn't like the look of this lace quite as much as the 3/1 lace, which has a certain symmetry I found lacking in the 5/1 lace.

5/1 Lace front (L) and back (R)
I also did some colour studies in my sampler such as an weft float in contrasting yarn, loom controlled inlay, and a couple of colour variations, but the purple I used as my contrast colour is very difficult to see (some would say impossible to see) against the bright royal blue of my background, so I am not including photos of these studies here.  Suffice it to say that I did these techniques, and while I liked the effect on the front of the work (although it would have been more impressive with a thicker contrast yarn), I did not like the big floats of contrast colour on the reverse side of the work.  These effects got a big "meh" from me, but they are likely very useful to know for the right work (perhaps for something lined so that the messy underside is hidden).

Another lovely pattern is the Double Huck Spot Weave created with 5/1 weft floats and 2 pick up sticks used in sequence.  The first pick up stick is inserted 4 up x 2 down across the row.  The pattern is then worked with a series of 6 rows, with rows 2 and 4 being pattern rows with the pick up stick in the neutral position, and rows 1, 3, 5, and 6 being plain weave.  Once this series is completed the second pick up stick is inserted 1 up (2 down x 4 up, repeated across the row), and the pattern of rows repeats, with the second pick up stick being used in the pattern rows just as the first was.
5/1 Weft Floats (Double Huck Spot Weave) front (L) and back (R)
I can see how someone would be tempted to set up the second pick up stick pattern using string heddles because it must be an almighty pain in the butt to have to remove and re-insert the second pick up stick every 6 pattern rows.  It was fun for my little sampler, but I can see how the novelty would wear off really quickly if weaving a larger piece.  Which is a pity, really, because it creates a lovely effect.

Another of my favourite textures, the Window Pane laces, are created by warp and weft floats.  The first is a 3/1 Window Pane, which uses a single pick up stick set 1 up x 1 down across the row.  Unlike the plain 3/1 lace, which used the same pick up stick setup but only had a single pattern row with the heddle in the neutral position, the 3/1 Window Pane has 2 pattern rows in the series (rows 2 and 5), the second of which was woven with the heddle in the up position. The remaining rows (rows 1, 3, 4, and 6) are plain weave.  This pattern creates a wonderful symmetrical effect that is virtually indistinguishable from the front to the back, and is very easy to weave.

3/1 Floats (Window Pane) front (L) and back (R)
The 5/1 Window Pane also produces a very interesting effect, and although it is not symmetrical from front to back like the 3/1 Window Pane, the back is pretty in its own way.  This pattern is woven, like the 5/1 lace, with a single pick up stick set 1 up x 2 down, repeated across the row.  For this pattern there are 3 pattern rows (rows 2, 5, and 7) with the latter two pattern rows being woven with the heddle in the up position.  The remaining rows (rows 1, 3, 4, 6, and 8) are plain weave.

5/1 Floats (Window Pane) front (L) and back (R)
I also played with my new tassel twister because hey, why not?  It worked great, and I can see how it would produce a lovely effect on longer fringes (rather than the stumpy little fringe-ettes I had in my sampler).


So all in all it was a fruitful evening spent learning many interesting new textures.  I already have a few I would like to incorporate into my next throw, if not all the way through, certainly near the edges for interest.